Mike’s Retrofit Aircon Cruise Heated Seats ++

Eddie Zedder

Zorg Guru (III)
Supporter
British Zeds
Joined
Jun 10, 2015
Points
148
Location
Megawatt Valley, Notts.
Model of Z
Z3 2.0
I found yet another one this afternoon - hiding under the M seat bases: it runs up the back of the seat, not into the seat bases. It has two thin black wires - anyone one know what it is for?
These were fitted to later model sport & m seats, It's a cut off switch, in the event of a rollover it opens and cuts power to the seat motors. It plugs into the loom that's attached to the seat frame, the plug won't be present if it is an earlier seat frame.

Apparently a driver in the USA had a lawsuit against BMW. He rolled his Z3, damage to the seat switch operated the motors pinning the driver against the steering wheel, hampering escape, hence the subsequent fitting of the cut off.
 

Pingu

Zorg Guru (IV)
3rd Party Trader
Joined
Dec 8, 2011
Points
165
These were fitted to later model sport & m seats, It's a cut off switch, in the event of a rollover it opens and cuts power to the seat motors. It plugs into the loom that's attached to the seat frame, the plug won't be present if it is an earlier seat frame.

Apparently a driver in the USA had a lawsuit against BMW. He rolled his Z3, damage to the seat switch operated the motors pinning the driver against the steering wheel, hampering escape, hence the subsequent fitting of the cut off.
I can go out to play, as I've just had my education for the day.

Many thanks :thumbsup:
 

MickyG

Dedicated Member
Joined
Nov 9, 2025
Points
38
Model of Z
3
These were fitted to later model sport & m seats, It's a cut off switch, in the event of a rollover it opens and cuts power to the seat motors. It plugs into the loom that's attached to the seat frame, the plug won't be present if it is an earlier seat frame.

Apparently a driver in the USA had a lawsuit against BMW. He rolled his Z3, damage to the seat switch operated the motors pinning the driver against the steering wheel, hampering escape, hence the subsequent fitting of the cut off.
Many thanks for the enlightenment 🙂
One less plug to worry about!

Do you know what this on is?
IMG_7750.jpeg


This was hidden under the carpet beneath each seat?
Is it airbag related?
 

Eddie Zedder

Zorg Guru (III)
Supporter
British Zeds
Joined
Jun 10, 2015
Points
148
Location
Megawatt Valley, Notts.
Model of Z
Z3 2.0
Many thanks for the enlightenment 🙂
One less plug to worry about!

Do you know what this on is?View attachment 355603

This was hidden under the carpet beneath each seat?
Is it airbag related?
I think they maybe for the seat belt pretensioners but not 100% sure.
My Zed is garaged up at the moment but I will take a look when I get the chance.
 

MickyG

Dedicated Member
Joined
Nov 9, 2025
Points
38
Model of Z
3
I think they maybe for the seat belt pretensioners but not 100% sure.
My Zed is garaged up at the moment but I will take a look when I get the chance.
It’s not the seatbelt pretensioner - that has a purple plug on it and is used by all Z3s. T
The spare plug I’m showing must be for something that is not run-of-the-mill spec.
I’ll post the wire colours tomorrow: but without knowing what it’s for it’s difficult to look it up via a wiring diagram.
 
Last edited:

MickyG

Dedicated Member
Joined
Nov 9, 2025
Points
38
Model of Z
3
It’s not the seatbelt pretensioner - that has a purple plug on it and is used by all Z3s. T
The spare plug I’m showing must be for something that is not run-of-the-mill spec.
I’ll post the wire colours tomorrow: but without knowing what it’s for it’s difficult to look it up via a wiring diagram.
The wire colours are:
Drivers side:
White/yellow
Purple/blue
Brown/orange

Passenger side
White/
Purple/blue
Brown/orange

Any ideas?
 

MickyG

Dedicated Member
Joined
Nov 9, 2025
Points
38
Model of Z
3
My Z3 came fitted with a hideous (to me) Silver fascia multi-light flashing after market radio.
In my haste to dispose of it, I’ve now left myself slightly 🫤 confused - (not difficult these days😂)
IMG_7852.jpeg


I guess these two plugs were for the radio?
I say guess, because it had an after market plug spliced on
IMG_7855.jpeg

…..with much thicker wires: yet they are spliced onto thin wires to the next plug:

IMG_7858.jpeg


Could this be the plug that went into my “Disco lights” radio?”


Then if this is the aerial plug ?
IMG_7859.jpeg


What is the thick
cable and small white plug for?
IMG_7860.jpeg

IMG_7863.jpeg


Again, any ideas?

I’m now ready to button up my centre console to finish off the whole retro swap, but just want to be sure these plugs are for the radio only - I will have to come back to them in the future once I’ve decided what will replace the single DIN radio.
 

Attachments

Tony Francis

Zorg Addict
British Zeds
Joined
Jul 22, 2023
Points
56
Location
South Somerset
Model of Z
Z3 1.8 M43TU
The small white plug under the main radio connector is the CD changer control connector. On an original radio there is a matching socket that enables the radio to operate the CD changer if fitted. The other end of that cable will be in the boot but maybe hidden behind trim if a CD changer was not originally fitted.
 

MickyG

Dedicated Member
Joined
Nov 9, 2025
Points
38
Model of Z
3
After going through my wiring umpteen times I finally felt I had it in place to make everything work, and more importantly, to feel confident enough to hide all the surplus wires/plugs that were always there but hidden previously.

I then decided to fit all the switches to their respective plugs and run tests on each switch/light etc.
Hey presto it almost all worked!
Seats moved up/down backwards forwards.
Aircon buttons all lit up (I can’t test it until it’s re-gassed), and heater controls all worked.
The heated seats both worked.
The analogue clock worked - as well as the digital OBC at the same time🤗
Engine fired up first time, which was reassuring.

I do have two snags:
The airbag light comes on and stays on - I fully expected this as I’ve read on here that if you reconnect the battery before the airbag and its sensors are all connected it will throw a permanent fault: it should be straightforward to have it switched off at my local garage🤞

Dash backlights.
This proved quite interesting: It started with no obvious back light to the heater control panel (it has two bulbs).
Then I realised there are one each for the cigarette lighter, ashtray and main headlight switch.
After much swapping and changing of bulbs I found all the wiring worked, but three of the five bulbs had blown.
IMG_7865.jpeg

Then came a shock - a quick google suggested the cheapest replacement bulb I could find was £14 each!!! X3 = £42!!! These bulbs are made as a sealed unit with a bespoke plastic molding to suit only BMWs, making them unique, and VERY expensive!

A lot more googling provided a much more palatable solution, and it all came back to this forum!
A member had shown in a previous thread that it is possible to snap the existing glass bulb out of the plastic molding and then remove the two connector contact pins that remain in the molding. Then source a capless T5 286 12v 1.2w standard bulb:

IMG_7864.png

……. which have two external bare wires for contacts. By carefully bending the two wires down straight and feeding them through the plastic molding it makes an effective copy of the original bulb/holder that can be plugged into the original loom connector.

So I’ve ordered 10 for the princely sum of £3.99 - delivery by Friday.🤗
Assuming the wires don’t break whilst bending and feeding them through the plastic molding it will be a very simple cost effective solution.🤗🤗🤗
 
Last edited:

MickyG

Dedicated Member
Joined
Nov 9, 2025
Points
38
Model of Z
3
The small white plug under the main radio connector is the CD changer control connector. On an original radio there is a matching socket that enables the radio to operate the CD changer if fitted. The other end of that cable will be in the boot but maybe hidden behind trim if a CD changer was not originally fitted.
Excellent, thank you. And yes the other end is hanging loose in the boot.
As I don’t intend to have a CD changer and can’t see future owners wanting to either, I’m tempted to pull it out (provided it’s not too difficult to extract).
 

MickyG

Dedicated Member
Joined
Nov 9, 2025
Points
38
Model of Z
3
Not had a good day today🙁.
I have a hacking cough, and cold which never improves anyone’s day.

The day started well enough. The pack of 10 tiny T5 bulbs arrived in this mornings post 🙂.
A quick test proved the bare wire connectors can be bent without breaking.

IMG_7874.jpeg

Left : as they arrived
Right: wires straightened out

But from there it went downhill.

As can be seen the wires are very thin and quite short. When I carefully fed them into the BMW molded case the wires were not long enough to act as spades to connect with the cars loom socket.
I’d say I have a lot of patience when it comes to fixing (it’s really playing🙂) my cars. So I thought I’d solder the original plug’s terminals onto the bulbs- easy.

Well, no it wasn’t!

Despite trying for over an hour the bulbs’ wires would not take solder, and proved very fiddly trying to attach the pins. Even after I had two pins soldered on they would not press through the plastic without breaking off.
I had to admit defeat.
As I have a donor car, and the damaged Aircon matrix, with its heater control panel, I reasoned I must have 12 bulbs (5 per car plus 2 in the heater control panel).
After loads of testing I found 5 working bulbs - except the one that back lights the main light switch would not come with the sidelight switched on.
An hour later after testing the wiring (and bulbs again to be sure) and then trying to trace its original source I again gave up in frustration and switched all the lights off to save the battery.

Then as if to add salt to the wound I switched the ignition on, and lo-and-behold the b****y light switch backlight came on bright as a button!
Apparently BMW decided you need to be able to see where the light switch is in the dark before you can switch on the lights, so made it ignition activated. Harumph!

I’ve wasted so much time today………🙄

(But if I can draw a crumb of comfort from my wasted efforts, I now have 5 working backlights and so can begin to put my centre console back together…….. when I can be bothered…..I’ve had enough for today!!
 
Last edited:

MickyG

Dedicated Member
Joined
Nov 9, 2025
Points
38
Model of Z
3
I’ve been busy with other things (more of which later), but back to the Aircon retrofit………

The Final Stage (?)
I had hoped the final stage was to be like the Tour de France , proceeding triumphant and unchallenged onto the Champs-Élysées in Paris and onto the victory rostrum.
Unfortunately it was anything but!

After waiting a couple of months to finally meet up with a fellow Z3 enthusiast, it turned out the Aircon fan from his scrap Z3 1.9 was not a match for my Z3 2.8
So, having made a healthy profit from my donor Z3 2.2 I felt flush enough to buy a new Aircon fan.

BMW want an extortionate (read criminal) £945.00 for one of their own!

I researched after market ones for several hours cross checking RealOEM part numbers and their superseded current parts. I finally ordered an NRF 74025, stated as suitable for a Z3 2.8: cost £136.00.
(How in all conscience can BMW ask £945.00 for the same thing?!)

I received it from our Post lady yesterday like a kid at Christmas. Excitedly I thought “ All buttoned by lunchtime”. And it should have been.

But how wrong I was!

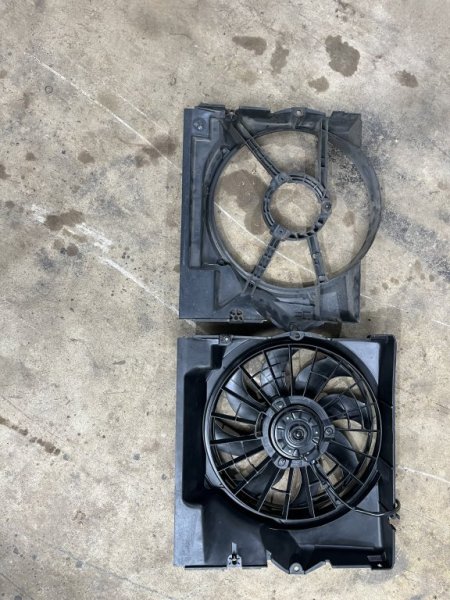
A quick comparison with my existing shroud began the alarm bells ringing.

IMG_8188.jpeg


Whilst there were broad similarities, there were some very obvious differences. The shroud is much deeper top to bottom, though this is actually a benefit enclosing the complete condenser making it more efficient.
However I could see there was going to be an issue with a duct like add-on in the top right hand corner. When offered up to the car this duct was never going to allow it to move upinto position.

IMG_8183.jpeg


Having done so much research I did not want to give up on fitting it without more thought.
I checked the locating positions and it seemed to be broadly the same as my existing shroud.
My conclusion was I had four options:
1. Send it back - but that would still leave me looking for an alternative, with no certainty it would fit any better.
2. Try swapping the motor onto my shroud - but there was no guarantee it would fit
3. Buy a used one, but it would be 25 years old and have an indeterminate life expectancy.
4. Commit, and chop the offending duct off and hope I could then make the shroud fit.

I chose 4 !

Cutting the duct off was easy, and had no detrimental effect on the shroud or fan.

“Great”, I thought: it will now be straightforward.

3 hours later I packed up, tired, dejected and thoroughly p****d off with pattern parts that don’t fit. Like a table cloth that is too small no amount of re-positioning would make it fit 😤

After sleeping on it, the thought struck me that it might be the brackets on the Nissen after market condenser that were out of alignment. However, a quick check this morning showed they were lined up nicely for my old shroud: so back to the NRF being the issue.

The main problems were that the fan attaches to the Aircon condenser but sandwiches a front brace between them on the 2.8.
(This brace is not fitted on 1.9s, hence why a shroud from it would not fit).


IMG_8190.jpeg


There are cut outs in the shroud perimeter flange to fit over this brace. This then tightly positions the shroud relative the cars chassis. However the shroud was not high enough relative to the fixings on the condenser.

To cut a longer story short, I had to cut a further 10mm from the shrouds top flange, remove some material from one of the lower condenser brackets and more from the shroud where it still fouled: then undo the condenser mounts to the slam panel, and fix the fan shroud to a “floating” condenser. Finally I used some judicious encouragement - ie brute force! - to push the shroud up to reach the slam panel fixings.

So tonight at 7.10pm after 2 days of my “unchallenged ride onto the Champs Elysees” I have finally emerged victorious: my Aircon system is completely installed……….

Or is it?…..🤷🏻

Before I can raise a glass to success, I will go to Kwikfit for a vacuum out, pressure test, and if all is good, get it charged with R134 gas.

Only once it is pressurised will I be able to check that the fan actually switches on and kicks in when required, and I get cold air on a hot drive.

Fingers crossed 🤞…….

(To be continued……)
 

Attachments

Last edited:

Pond

Zorg Guru (III)
British Zeds
Joined
Dec 26, 2016
Points
144
Location
Spaldingski, Lincs
Model of Z
3 litre Z3 pretending to be Italian exotica. Two previous E89 Z4s.
You have more patience than me.
BTW the first 'classic show' of the year at Birchgrove, Pinchbeck is this Sunday the 19th if you fancy popping along.
I will be there (as long as it doesn't rain) with my Fauxrrari.
 
Top